Thursday, May 29, 2008

Well, that's random!

I'm excited to see that my blog is highlighted today as "Today's Ten Random Blogs" on the Foodie Blogroll. A very warm welcome to my new visitors! Thanks for stopping by. I needed that kick in the butt to write a new post, so I'm going to make this a good one.

Oh boy, you're going to love this.

Chocolate Beet Cake! Let's get ready to rumble!!

This week, I received three beautiful red beets in my CSA box. If you've been to my blog before, you know how much I adore beets, but have only used the golden variety. Honestly, I feel like Lady Macbeth after chopping up a vegetable that oozes red juice everywhere.

However, red beets were present and accounted for and I had to carry on. Carefully.

Recently, I've read that the natural sugar in beets can enhance the flavor of chocolate. Yes, you read that right. So, I found a recipe for chocolate beet cake and decided to give it a go.

You're shaking your head in disbelief, right? You've shoved your chair away from the computer desk in disgust. Hands thrown in the air in utter contempt. You may even be sticking your fingers in your ears and singing "I'm not listening!" But if you trust me at all. Even the tiniest bit. Please, please make this cake.

Chocolate Beet Cake, posted by Paula Borchardt, Tucson CSA

approximately 1 cup cooked, chopped beets
1/4 cup water
approximately 1 cup applesauce, unsweetened
1 teaspoon vanilla extract
1 teaspoon apple cider vinegar
1 whole wheat flour
1/2 cup white flour
1/2 cup cocoa
1 cup sugar
2 teaspoons baking soda
1/4 teaspoon salt
1/2 teaspoon cinnamon
1 cup chocolate chips

Puree the beets and water in a blender or food processor. Pour into a large measuring container and add enough applesauce to make two cups total. Mix in the vanilla extract and apple cider vinegar.

In a separate bowl, mix all the other ingredients together; fold in the beet mixture and mix all thoroughly. Bake in a pre-greased 9×13″ pan at 325° for 35 minutes.

  • I boiled one large beet in a saucepan with just enough water to cover it. After I drained the water and pureed it, it was only 3/4 cup. I probably should have thrown in another half a beet to make it 1 cup. Oh well.
  • Quality ingredients make for a quality end product. I splurged and bought Ghirardelli cocoa and chocolate chips. No regrets here.
  • The original recipe called for 1 1/2 cups of whole wheat flour. I decided to take a chance and split that between 1 cup of whole wheat and 1/2 cup of white flour. Don't get me wrong, I love baked goods with whole wheat flour, but it tends to create a denser product. I wanted this cake to be light and moist. It was all that and more.
  • Notice there's no oil, eggs or milk in this recipe. If you used vegan chocolate chips, you would have a vegan dessert. Remind me to tell you sometime about my trip to San Francisco over a decade ago and my first visit to a vegan bakery (yes, JB, you were with me!) Aah, what a mere child I was then. So much to learn.

Notice there's no picture of the chocolate beet cake in this post.

That's because it's gone. Gone, baby, gone.

Now go make it!

Tuesday, May 27, 2008

Stress

I've done a massive amount of cooking (and baking!) over the last few days and have neglected to share it here. I promise that I'll put up the recipes today or tomorrow and share the pictures of this week's CSA box, too. But before I do that, I wanted to share my thoughts with you about a health issue that we all struggle with from time to time: stress.

Stress can be acute for many of us, while for others something that results slowly over the years. I've struggled with how much personal information I've wanted to share here and sometimes when I go silent for a few days it's because I'm not sure if it's even relevant to the blog. But the truth is, no matter how dedicated we are to living a healthy lifestyle, the unexpected can happen and we wind up sidelined.

I've been dealing with some acute stress brought on by the complexity and uncertainty of the adoption process and unfortunately it's manifested into some physical symptoms. Mainly, loss of appetite and energy. Hubby and I have had a very tough few weeks on our road to parenthood. But I'm pleased to say that we've managed far better than I ever expected. Mentally and emotionally, we've tapped our individual and joint strength. I'm so proud of the marriage we've created and our ability to deal with the emotional roller coaster we're on.

With all that said, I've been pretty surprised at my own body's reaction. In fact, I was pretty darn frustrated that my head felt fine, but my body refused to get back in the game. My workouts have been for crap and I've had no desire to eat the wonderful, healing foods I've been making. I thought I could just "will" myself to feel better. But the truth is, stress can be a shock to one's body and no amount of pushing or yelling or encouragement will make healing go any faster. It just takes time and patience and the knowledge that it's just a temporary situation.

Recently, someone offered me a great metaphor for how stress affects our bodies. Imagine a swimming pool full of clear, blue, calm waters. Then, someone spills a bottle of ink in it. You can't just get a ladle and scoop the ink out. It's everywhere and the filters just need time to clean in out.

I'm learning to treat myself more gently and let my body's filters do their job. I'll eat better when my body is ready. I'll have more energy for the treadmill soon. But pushing myself-or judging myself harshly- is like adding another bottle of ink to the pool. It will only make things worse.

So, if you're dealing with stress now, please think about what I said. Whether your stress is the result of work, a sick loved one, buying or selling your house...please be gentle and kind to yourself. Putting high expectations on yourself might only aggravate your health further.

Friday, May 23, 2008

Packing lunch, among other things...

In my preparation for motherhood, I've been thinking a lot about how kids eat today. If you're a parent or not, you can't ignore the convenience products in bright & fun packaging on grocery store shelves and promoted rather effectively on television. Yogurt in tubes, purple colored ketchup, and cookies in "fun" shapes. Everything possible to entice kids to eat. Except it's so hopped up on preservatives, salt and sugar, that kids today never really know how tasty real food in it's pure form can be. I have some pretty strong feelings about this, so I'm trying to be careful and not go on a rant. I can only tell you that over the last 1.5 years that hubby and I have transitioned from processed foods to whole foods, I've discovered that my palate has suddenly come alive. There's so many flavors that I didn't even know existed. It's enhanced our lives in numerous ways and I doubt we'll ever go back to our old ways.

During the adoption process, hubby and I have been asked to reflect and write down our parenting philosophies. This is such an abstract question and it's really hard to know where to begin. One of the hopes I have when we are parents is that we'll be able to share our joy of nutritious healthful food with our kids. I've been thinking a lot about how to bring up "thoughtful eaters." And I've come to a few conclusions.

1) Plant a vegetable garden. It's incredibly empowering to order seeds, plant them, nurture their life, and eventually harvest them and add them to your meals. I think it instills a sense of wonder to watch it happen before you eyes.

2) Visit an organic farm. Talk about seasonal eating with your kids and let them discover for themselves the difference between a strawberry in January and one picked in the summer.

3) From a very early age, have your child eat exactly what you eat. I've been inspired by some of my friends who are parents who placed steamed broccoli and fresh pineapple on their 2 year old's plates. And when talking about food with your kids, nothing should fall in the "good" or "bad" categories. Just practice moderation. And don't use food as a reward or a punishment. Developing healthy relationships with food at a young age will be the best gift we can give.

4) Even though your young child can't run heavy machinery in the kitchen yet, there's no reason they can't be your sous chef by tearing pieces of chicken apart or separating orange slices for a salad. Involving your child in meal planning and cooking may encourage them try new food you introduce.

5) Pack lunch for your child - even if you do it the night before. It doesn't have to be elaborate, but it will definitely be healthier than those shrink wrapped plastic trays of "food" sold for your convenience.

Now, I know I'm taking a big risk by sharing my theories of parenting a child with you. I don't have a child yet and I'm kind of afraid you'll think I'm making unrealistic suggestions. But I do know that there's nothing more important than our health and well being. I really believe this is a life long gift we can give our kids.

So, I'm getting my practice in now and I've started to pack lunch for my hubby. He's been working very long hours recently and has been eating late. I decide to purchase a modern day "bento box" from Laptop Lunches. You can find their products at www.laptoplunches.com.

Today's lunch consisted of aromatic lime-peanut whole wheat linguine with sugar snap peas, sliced fuji apple, spring mix (from the CSA!) with goat cheese & cranberries and a mix of pistachios, walnuts, pecans and cashews. The little blue box off to the side contains some homemade dressing. Each laptop lunch comes with a case with a place to insert an ice pack inside.


I'm curious to hear what you're doing to encourage your kids to eat well and have a positive relationship with food. Please share in the comments section!

Tuesday, May 20, 2008

Quick Recap for Week 2

I'm sorry I've been absent the last few days. I believe I caught a mild bug of some kind. The worst of the symptoms is that I've totally lost my appetite! I've actually still been cooking, just not eating as much. But I don't want these veggies to go to waste, so let me recap you on how I've been using the contents of the CSA box this week.

Even though I didn't get green onions in my box this week, I heard that some others received it, so here's a great way to enjoy a lean chicken burger with that addition.

Chicken Burgers with Peanut Sauce from Cooking Light

Sauce:

2 tablespoons peanut butter
2 teaspoons low-sodium soy sauce
1 1/2 teaspoons dark sesame oil
1 teaspoon water
1 teaspoon rice vinegar
1 garlic clove, minced

Burgers:

1/2 cup finely chopped green onions
1 tablespoon chile paste with garlic
2 teaspoons grated peeled fresh ginger
2 teaspoons low-sodium soy sauce
1/4 teaspoon salt
1 pound skinless, boneless chicken breast, chopped
Cooking spray
4 (2-ounce) sandwich rolls with sesame seeds
1 cup onion sprouts or alfalfa sprouts

To prepare sauce, combine first 6 ingredients, stirring with a whisk until smooth. Prepare grill. To prepare burgers, place onions and next 5 ingredients (onions through chicken) in a food processor; process until coarsely ground. Divide mixture into 4 equal portions, shaping each into a 1/2-inch-thick patty.Place patties on a grill rack coated with cooking spray; grill 4 minutes on each side or until done. Place rolls, cut sides down, on grill rack; grill 1 minute or until toasted. Place 1 patty on bottom half of each roll; top each serving with 1/4 cup sprouts, about 1 tablespoon sauce, and top half of roll.

Yield 4 servings.

  • I cheated and used the broiler. I have a confession. I've never learned to start a charcoal grill. I'd really like to invest in a gas grill (hubby is a purist and will be hard to convert) just so I can use the grill with ease during the summer. The broiler worked out fine, but I'm sure it would be fantastic on the grill.
  • Did you notice that lovely romaine leaf added to the burger in the picture? I've noticed recently that it's a lost cause asking for lettuce on sandwiches or burgers when ordering out. You never get a beautiful leaf like the one we received from the CSA this week. Instead, you get shredded iceberg lettuce that basically tastes like water in solid form. Makes for a very sad looking sandwich. Sniff.
  • To make my life easier, I passed on the food processor and went straight for ground chicken from Whole Foods. It actually was excellent. This dish literally took 5 minutes to put together.
  • When will I ever learn? I bought chili paste with garlic for this recipe and took a quick whiff and taste before adding it to the burger. I am a wimp. I could not handle the heat and totally skipped it. My throat was literally on fire from a mere pinch of it. Later, while peeking in the fridge, I noticed another opened jar of chili paste with garlic! It was basically full and it dawned on me that I probably just did the same thing twice. Bought it for a recipe, tasted it and never used it again. Classic Karen.
  • The sauce was decent, but I would add a little more water next time. It was very thick and not very appetizing to look at. But tasty, nonetheless.

Also on the menu this week was Roasted Lemon, Asparagus & Green Garlic - inspired by two bloggers. Lori at The Recipe Girl (http://www.therecipegirl.blogspot.com/) and Laura at The Spiced Life (http://www.thespicedlife.blogspot.com/) both inspired me to try roasting a lemon for the added depth in flavor. I just sliced the lemon and placed it on top of asparagus & green garlic on a baking pan. Before I put the lemon on, I added 2 T of extra virgin olive oil and kosher salt and pepper on the veggies. Then I laid everything flat on a baking sheet and roasted it at 400F for 25 minutes. I paired it with turbot cooked briefly (6 minutes on each side) in a skillet with white wine. I added freshly grated parmesan on everything and enjoyed it immensely! The smell of the veggies and lemon roasting was truly out of this world. By the way, as Laura suggested, don't try eating the lemon. Just squeeze the juice onto the veggies and discard the rest.

One other quick dish I made was a Spinach & Strawberry Salad. We didn't recieve that much spinach this week, but it is so mild and sweet that I prefer eating it raw. I chopped up some spinach, sliced about 4 large strawberries, added 2T of crumbled goat cheese, 1T of sliced almonds and drizzled my favorite balsamic vinegar on everything.

On tap today is soup. We have some amazing collard greens this week. I thought I would create a white bean and greens soup and use the rest of the green garlic, too. I'm totally winging it!


Monday, May 19, 2008

CSA - Week 2! Can you handle this?

Okay, first off, I'm in love with fresh herbs. Who knew that chives were so darn beautiful?


That picture alone would woo any baked potato with sour cream, in my book.


Okay, here's what's on tap for this week. Clockwise starting at the chives in the upper right hand corner: Spring mix, romaine (but I'm not positive, since the leaves are unusual), radishes, asparagus, rhubarb, spinach, green garlic and in the center, there are collard greens.


You may be wondering how I did getting through the mother load that was CSA Week 1. I'm pretty happy with how it went, considering my hubby ate out for a few dinners and we were gone all day yesterday. I did work pretty hard to get through everything, though. The only recipe that I didn't report on was a spinach-feta turnover that was just "okay"in my book, but my best buddy who dog sat for us yesterday ate one and loved it.

I do have some mint left - which I've been enjoying in iced tea all week. Also, there's a huge head of romaine that I never in touched. So, I'll be serving that with dinner tonight. Oh, and a cup of sliced rhubarb that I'll make into a savory chutney tonight to serve with fish or chicken later this week. My blogger pal Mo at Paws & Pours (http://www.pawsandpours.blogspot.com/) made that great suggestion.

Compliments from the chef

If you live in the Washington, DC area and happen to find yourself on Rockville Pike take it all the way to The Lemon Tree Mediterranean Market and Gourmet Cafe (http://www.lemontreemarket.com/) and get comfortable for a bit. There's a lot of wonderful meals to sample. We've had great luck there both food and service-wise. A little while ago I was having lunch there with my friend and her baby girl. I soaked in (though thankfully didn't spill a precious drop) their red lentil soup. I went so nuts for it, that for the first time in my life I asked if I could have the recipe. Pretty brazen of me, eh?

About ten minutes later, a lovely man in his seventies came to our table and carefully explained all of the steps for his treasured red lentil soup. He spent thirty minutes with us to make sure I had the recipe down pat. I was blown away by his generosity and kindness. A few minutes later, we received a plate of grape leaves. Compliments from the chef. They were outstanding.

With that in mind, I decided to use the remaining spinach from my CSA box this week to make something similar.

Thank you to Ricki at Diet, Dessert And Dogs for this fantastic recipe for Dolmade Casserole.

Go straight here, do not pass go or collect $200 for Ricki's take on a deconstructed stuffed grape leaves:

http://dietdessertndogs.wordpress.com/2008/05/16/dolmades-deconstructed-mediterranean-rice-casserole/


Hey that's my wedding china that dolmade casserole is on! I took it out last week for a Mother's Day lunch and haven't put it back yet. Guess I better do that before our puppy Sami decides to make us register for one last place setting. Yeah, right.


Wednesday, May 14, 2008

Putting that "Easy Bake Oven" to shame

Back in the early 80's, when I was so tiny that I could barely see above the kitchen counter, all I wanted was an "Easy Bake Oven" by Hasbro. I also thought I would die without the Snoopy shaved ice maker, but that's a story for another post. My parents bought one for me - even after I dyed the living room rug pink after an unfortunate Hawaiian punch incident.

There it was...a mini version of my grandmother's oven. I remember that day so well. I chose the brownie mix, placed it gently in the oven (heated by a 100 watt bulb) and waited patiently before I slid the purple plastic spatula in to try my creation.

I enjoyed it so much, that I never ever used it again after that first time. Was the brownie inedible? Did I complain that it was just too much work and I had a pile of bills to get to? I truly have no idea what happened next. But it was never seen again. It found it's way into our basement and I assume it's still there today unless it was picked up by a neighbor after one of our summer yard sales.

Perhaps baking, even the easy bake way, wasn't my cup of tea. Fast forward about 25 years later and I'm still wary about baking. But the rhubarb in my CSA box presented a new challenge to me. I've never had one, but I heard they were pleasantly tart. I was also told that I must balance that tartness out with sugar. So, I located a recipe by a fellow Cooking Light bulletin board participant and gave it a shot this morning.

Oh. My. Rhubarb. Where have you been all of my life! It's an unusual treat for me to get to try a flavor that I've never had before. I'm struggling to describe the exact taste - I would have to say it has a lovely lemony taste to it. Basically, this pudding cake really is a perfect balance of tart and sweet.


Rhubarb Strawberry Pudding Cake from Epicurious

1/4 cup water

1 1/2 teaspoons cornstarch

1/3 cup plus 1/2 cup sugar

2 cups chopped fresh rhubarb stalks (10 ounces)

1 cup chopped fresh strawberries (5 ounces)

1 cup all-purpose flour

1 3/4 teaspoons baking powder

1/2 teaspoon salt

1 large egg

1/2 cup whole milk

1 stick (1/2 cup) unsalted butter, melted and cooled slightly

1 teaspoon pure vanilla extract

Put oven rack in middle position and preheat oven to 400°F. Butter an 8-inch square glass or ceramic baking dish. Stir together water, cornstarch, and 1/3 cup sugar in a small saucepan, then stir in rhubarb. Bring to a simmer, stirring constantly, then simmer, stirring occasionally, 3 minutes. Remove from heat and stir in strawberries.

Whisk together flour, baking powder, salt, and remaining 1/2 cup sugar in a bowl.Whisk together egg, milk, butter, and vanilla in a large bowl, then whisk in flour mixture until just combined.

Reserve 1/2 cup fruit mixture, then add remainder to baking dish and pour batter over it, spreading evenly. Drizzle reserved 1/2 cup fruit mixture over batter.

Bake until a wooden pick inserted into center of cake portion comes out clean, 25 to 30 minutes.

Cool in pan on a rack 5 minutes before serving.

  • This was ridiculously easy and fast. It took me about 15 minutes to put together. If you see rhubarb in the store, don't pass it up.
  • I found this dessert very satisfying, but I didn't reach for seconds. Not because it wasn't good, but because it hit the spot without being irresistible. It's just tart, crunchy and interesting.
  • I can't remember the last time I purchased whole milk. I used fat free milk and it didn't affect the outcome at all.

Tuesday, May 13, 2008

And now for something completely different

Okay, I've never in my life tried a radish. In fact, I'm sure I've gone out of my way to avoid them. Of course, I appreciate a lovely garnish as much as the next guy - especially vegetables carved to look like flowers. However, I wasn't about to take out my paring knife and go to town on the 10 little radishes I received in my CSA box this week.


So, I turned to roasting! I quartered the radishes and placed them in a casserole dish mixed with a little extra virgin olive oil, salt and pepper & minced shallots (for a touch of sweetness.)


Paired with cooked orzo , goat cheese, and freshly squeezed lemon juice, these little roasted radishes were not half bad. Pretty tasty, actually! There's a bowl waiting for hubby upon his return from work. I'll let you know his verdict later tonight.


Take a looksie...


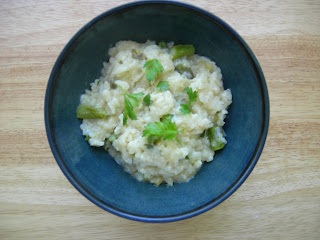
Yellow & Mellow: a spring risotto

Little darlin, it's been a long cold lonely winter. Little darlin, it feels like years since you've been here.

Here comes the sun.

Here comes the sun.

And I say, it's alright.

The downpour of the last four days has finally stopped and the sun has never looked better. I was really missing it after several days of gray and dreary. But even through the rain yesterday, I noticed CSA members were all smiles and downright giddy about getting the first box of the season. I even bumped into a dear friend from a job I had long ago - how funny that we would be at the pick up spot at the same time! I'm sure we'll share a few CSA inspired meals now that we found each other again!

Last night after organizing & separating the goodies from the box, I pulled out the green garlic and asparagus for dinner. Green garlic, also known as baby spring garlic are the fresh shoots of an immature garlic plant. They look almost exactly like scallions, but a quick whiff will prove otherwise. While it's certainly milder, there's no doubt it's garlic. I only used the white and pale green parts for the risotto.


Leek and Green Garlic Risotto
Adapted from "Local Flavors" by Deborah Madison

Green Garlic and Leeks:

4 medium leeks, white parts only
3 large heads green garlic
2 tablespoons unsalted butter
1/2 cup white wine
salt and pepper to taste

Rice:
6 cups of vegetable or chicken stock
2 tablespoons unsalted butter
1 1/2 cups Arborio rice
1/2 cup white wine
1 cup freshly grated Parmigiano-Reggiano cheese
1/2 cup chopped chervil or parsley, and/or leftover green garlic tops
Zest of 1 lemon, finely chopped
salt and pepper to taste

Quarter leeks lengthwise, cut them crosswise into 1/4-inch slices, and wash well. Remove any tough papery husks from garlic, then finely chop bulbs.

Melt butter in a sauté pan. Add leeks and garlic, stir to coat, then add wine and cook over medium-low heat until leeks are tender, about 10 minutes. Season with salt and pepper and set aside while you cook the rice.

Have stock simmering on the stove. Melt butter in a wide soup pot over medium heat. Add rice and cook, stirring for 1 minute.

Pour in wine and simmer until it is absorbed, then add 2 cups of the stock. Simmer until it has been absorbed, then raise heat to medium and begin adding stock 1/2 cup at a time. Stir energetically and continue adding liquid after each addition is absorbed. Rice is done when tender with a slight bite, about 35 minutes. Stir in leeks, cheese and herbs.

  • I didn't have any leeks last night, so I used three small shallots in it's place. I thought it added a lovely sweetness to the dish. However, cutting shallots always makes me cry! No matter what I do...
  • You know, I usually make risotto on the weekends because of the time factor. But the truth is, once you get the hang of it, it's not so hard to make. You definitely need to commit to standing in one place for 30 minutes. That's for sure. But it's worth the stirring effort. At least I think so.
  • Don't skip the zest!
  • I steamed the asparagus - which was absolutely beautiful- sliced it, and added it at the very end.

Monday, May 12, 2008

We're going to need a bigger boat

May 12, 2008. CSA Week 1

All I have to say is....

WOW.

I'm utterly speechless.


I remember reading somewhere that the first few weeks of the CSA were leaner. If this is lean, I think we're going to need a bigger boat, folks. (What movie, please?)

So, if the picture is a clock face, we've got spring mix at 12:00, then the biggest head of romaine lettuce I've ever seen, rhubarb, radishes, green garlic, unidentified lettuce (this one's a mystery, but it's definitely mild tasting)**, asparagus, and wonderful refreshing mint! And there's another bag of spring mix I couldn't fit in the picture.

To give you some idea of how large the contents of this box is, it takes up half of my dining room table which seats 6 people.

I wish it wasn't so rainy and grey, because the natural light in the dining room is the best in the whole house. So future pictures will look much better than this, I promise!

At some point a few months ago, I read about green garlic soup on someone's blog. If you're out there reading this, be sure to drop me an email, please!

I will take any and all suggestions for recipes, folks. I've done my own research, but I love hearing from other test-drivers out there.

**I'm a doofus. It's spinach.


Today's the day! It's finally here!

I've been counting the days ever since we sent our application into Sandy Springs CSA in January. Today is the first day of our CSA membership. Around 2pm, I'll drive to my local pick up point and receive my weekly veggie box. I assume today's box will contain asparagus, spring mix and rhubarb.

I realized I didn't update anyone on the actual visit to Calvert Farm - the source of our CSA - last month. Here's a quick recap:

Calvert Farm's owner, Farmer Pam, and her farm manager, an Amish Elder, were incredibly knowledgeable and couldn’t have been nicer. On Saturday, April 17, they gave a very enlightening tour of the organic farm to my group which was made up of five children and several volunteers from Sierra Club’s Inner City Outing (ICO) program. The ICO participants leave their neighborhoods – often some of the roughest and under-resourced areas of DC- to commune with nature on hikes and camping trips. The farm was certainly a new experience for them. Farmer Pam set a beautiful table in the shade for us when we sat down to lunch. She dressed it with mason jars full of fresh apple and pear blossoms. Those fruit bearing trees greeted us as we turned into the farm for the first time. Pam offered us some freshly picked spinach, which was by far the most delicious spinach I've ever had. The adults couldn’t get enough of it, but I believe it might have been the first time these kids have ever tried it.

A few minutes later, we were all standing in the fields where the spinach was growing, learning about the natural ways to battle the weeds around them. First, they use a hot pepper spray made from the peppers grown on the farm. But, one particularly resilient weed to kill was thistle. Farmer Pam explained that they were trying to suffocate the thistle with heat by laying mats on them held down by bricks – allowing the sun to do its job.

As the kids were soaking all the information in, they also tried to keep track of the other tour guides which led them through the farm – 18 friendly cats! Each cat had a different personality. Some brazenly trotted alongside the cauliflower pushing it's away up from the ground. Others slept quietly in the tomato plants. One even sat on a chair with us during lunch like a gracious host.

My favorite moment of the day was when our kids discovered that mint actually grew from the ground. After smelling herbs like rosemary and basil and recalling how they were used in cooking, they were blown away when they caught a whiff of natural mint. You could see the wheels turning in their head, wondering how this scent made its way into a stick of gum!

At the end of our tour, we had the opportunity to plant spring onions. The kids took the job very seriously. They thoughtfully listened to Pam’s instructions and carefully watered the new vegetables after planting them three inches apart.


We were very honored that Pam and her workers took the time out of their packed day to spend a few hours with us. You can see how hard they all work to have a successful farm. It's definitely not a 9 -5 job.

Here's a quick FAQ about our CSA:

What exactly is a CSA?
CSA stands for Community Supported Agriculture. Our CSA is a led by volunteers and receives it's vegetables from a farm less than 100 miles away. It's usually a certified organic (and local) farm which offers shares to it's consumers. By offering shares, the farmers are able to plan their crop, limit waste and pay their expenses up front. Basically, it allows them to make a living with less risk.

Tell me more about this share....
We paid $600 in January for one share. One share provides a weekly box of vegetables and fruit for 20 weeks. With rising food costs, we'll probably be saving money along with supporting a local farm. We won't be able to chose the contents of our weekly box. It's made up of what's been harvested that week. We'll be eating seasonally and trying new things. During the summer, the box will get fulller and fuller as the crops are more bountiful.

How do I find out about a CSA near me?
I found Sandy Springs CSA by going to www.localharvest.org and typing in our zip code. I also asked questions on discussion boards like Chowhound and Cooking Light to read about other people's experiences. I mostly found that the idea was incredibly popular. People were on waiting lists to get a share!

Any other questions?
Please feel free to email me at testdrivekitchen@yahoo.com or leave a comment. I'll be sharing CSA stories on this blog as well as recipes throughout the next 20 weeks.

Thursday, May 8, 2008

Chicken or Salmon?

Yes, it's that time of year again. The flutter of large envelopes falling from mail slots everywhere and landing in your foyer. Pretty stamps, fancy writing and loving words. All enticing you....to pick chicken or salmon. Which will it be?


After attending about 25 weddings in a three year span, I always went with our pink friend from the sea. Why? Because you really have to try hard to mess it up. I mean, you have to have a fish vendetta to make it taste inedible. It's light, it's healthy and it doesn't need much to showcase it's flavors.

If you read any cooking, nutrition or fitness magazine, you're bound to see the benefits of salmon highlighted within the pages. If for some reason you've missed it, here's a great article about salmon's nutritional benefits:


http://www.whfoods.com/genpage.php?tname=foodspice&dbid=104


Personally, I've found that eating fish at least 2 or 3 times a week - especially salmon- provides relief from any pain I feel due to inflammation. Fish oil is a natural anti-inflammatory. But why take those horse pills full of fish oil when I can enjoy the actual fish?

When picking salmon from the glass case, I always ask the fishmonger for the tail. It has virtually no bones in it and I enjoy my meal more because of that. I also make salmon the first day I purchase it. I know that it can be frozen, but for me defrosting fish affects the flavor.


Usually when you unwrap your fish when you get home you will notice the portion is uneven. I finally figured out that I must slice through it horizontally to create even fillets. Otherwise, I'm constantly going into the oven and finding a cooked fish all around with a red mushy center. I used to overcook the fish to make sure the center was done, and that led to the worst tasting over cooked meal ever. But this trick has helped (if I remember to do it!.)

I've also been baking salmon at a high heat for a shorter period of time. Try 450 F for 12 minutes and see if you're there yet.

For flavors, I always go very simple. A little white wine and some fresh dill does the trick. But you can do any herbs you like. It's totally up to your preference.


I do have a funny salmon story to tell you. The first year that my hubby and I lived together, he took a ten day trip to Alaska with "the boys." I was bummed because I wanted to go to Alaska on my honeymoon, but he was taking the trip ten months before our wedding. Well, he made it up to me by promising to send fresh salmon that he caught on a fishing trip. I honestly didn't know what to expect when the fed ex cooler was on the doorstep. I honestly imagined a whole fish with blank eyes staring up at me. I was totally freaked and didn't want to open the cooler. So I took everything out of the freezer and tried to stick the entire cooler in. I was short about 1 1/2 inches. I couldn't do it. So alas, I sucked in my breath, put on some latex gloves, peeked through squinted eyes and opened the cooler preparing to see one dead ugly fish.


What?! No scary fish! It was fillets!!! Oh thank goodness. My heart began beating again and I had a good laugh. They filleted them on the dock. I had 18 1lb fillets (we enjoyed them for about six months) not one scary fish like I expected.


Speaking of chicken or fish, weddings and hubby, today is our wedding anniversary. I'm a very lucky girl to be married to such a talented and loving guy. I would love to put up our wedding portrait, but I'm respecting hubby's privacy. But here's a shot of me trying desperately not to lose my veil to the wind before the ceremony:


Guess what? In a few short days - May 12 to be exact - our CSA begins and the blog shifts gears. From May 12-October 20th, we'll be receiving a veggie box from Calvert Farm every week. I'm going to showing you what's in our box every week and letting you know how I use everything and try not to waste a precious morsel. Check back this coming Monday to see the first box!

Thursday, May 1, 2008

Behind the scenes

This week was a perfect time to re-organize my pantry & kitchen. Now that Passover is over, grains and slowly making their way from my secret hiding place (the office) and back into the kitchen. Now is also a great time for me to remember the strategies I've developed to eat healthy and not waste food or money while doing it.


Now, I've never been what you would call "organized." Just ask my mother. Or my hubby. Or my freshman year roommate at college. But, I do like a good system now and then. So, I want to share a few ways that have worked for me this year.

1) First and foremost, I'd be lost without a clean pantry. If I can't see it, I won't use it. Even worse, I'll go out - buy it again - and send it into the darkest corner of the cupboard never to be seen again. Only to start the vicious circle over again. Once or twice a year, it doesn't hurt to take everything out of the pantry, take an inventory of what you have and make an honest assessment of what you really use.


2) I find the fridge much more difficult to keep organized. Up until yesterday I was relying on keeping a note on the door which listed my perishables for the week (which is usually 90% of my groceries!) If you peeked inside my fridge, you would find that the bottom shelf looked like a mosh pit after a Pearl Jam concert. It was impossible to pick out a scallion from a bag of spring mix. Finally, yesterday, I went to mecca (aka The Container Store) and purchased ten different clear containers & lids in various shapes and sizes. I can see what I have now! No more plastic bags! Seriously, this was the highlight of my week.


3) Sunday is my designated grocery shopping day. Back in the day when I wasn't so organized, I meandered into the grocery store say 3 times a week. That would lead to $200 weekly bills and food that would inevitably turn pretty colors before I could use it. But by taking the time to go through my recipe books over the weekend and meal plan for the upcoming week, I can write a reasonable grocery list and not buy in excess.


I've mentioned a few times on this blog that hubby and I have slowly changed our eating habits over the last 18 months by buying less and less processed foods and more whole foods. I'm not going to kid you, it's hard work to use up all of my vegetables, fruits and herbs in a week. But in the end, it's less expensive and far more satisfying. Here's how I get through most weeks:


1) I find a way to include a fruit or a vegetable in every single meal and snack hubby and I eat. The easiest meal in the world is soup. On Saturdays, I will take whatever I have left, put it in a pot and just go for it. As long as I have a can of tomatoes, chicken broth and a few herbs, I'm good to go.

2) To keep your meals interesting, you've got to take some risks and try flavors from around the world. Let your spice rack lead the way. This year I've been experimenting with so many different cuisines, but I have to say South African has been my favorite, so far. I ran out of cumin the other day and without it I felt totally lost.


A quick side note, I'm a big "Top Chef" fan and was particularly excited about this week's challenge. The chefs had to make a healthy meal for 4 people on a budget of $10. TOTAL! They all shook their heads depressed, but slowly realized that it could be done. I smiled as I watched them reach for beets, bok choy, lean chicken, peanut butter and zucchini. I knew they could easily win this challenge and present something fabulous while doing it.


More behind the scenes to come...